This is how you build a GIMX emulator using a Raspberry Pi that you can simply plug your wheel and your console into, and play, without the need for a PC in the middle:
- Buy or build a GIMX adapter: https://blog.gimx.fr/product/gimx-adapter/
- Buy a used Raspberry Pi 1 Model B+, a 2 or a 3: Amazon
- Get a 4GB or larger Micro SD Card: Amazon
- Burn the image gimx_dietpi.img on the SD card using Win32 Disk Imager
- Plug everything in according to this diagram, and you’re ready to go (G27 on PS4).
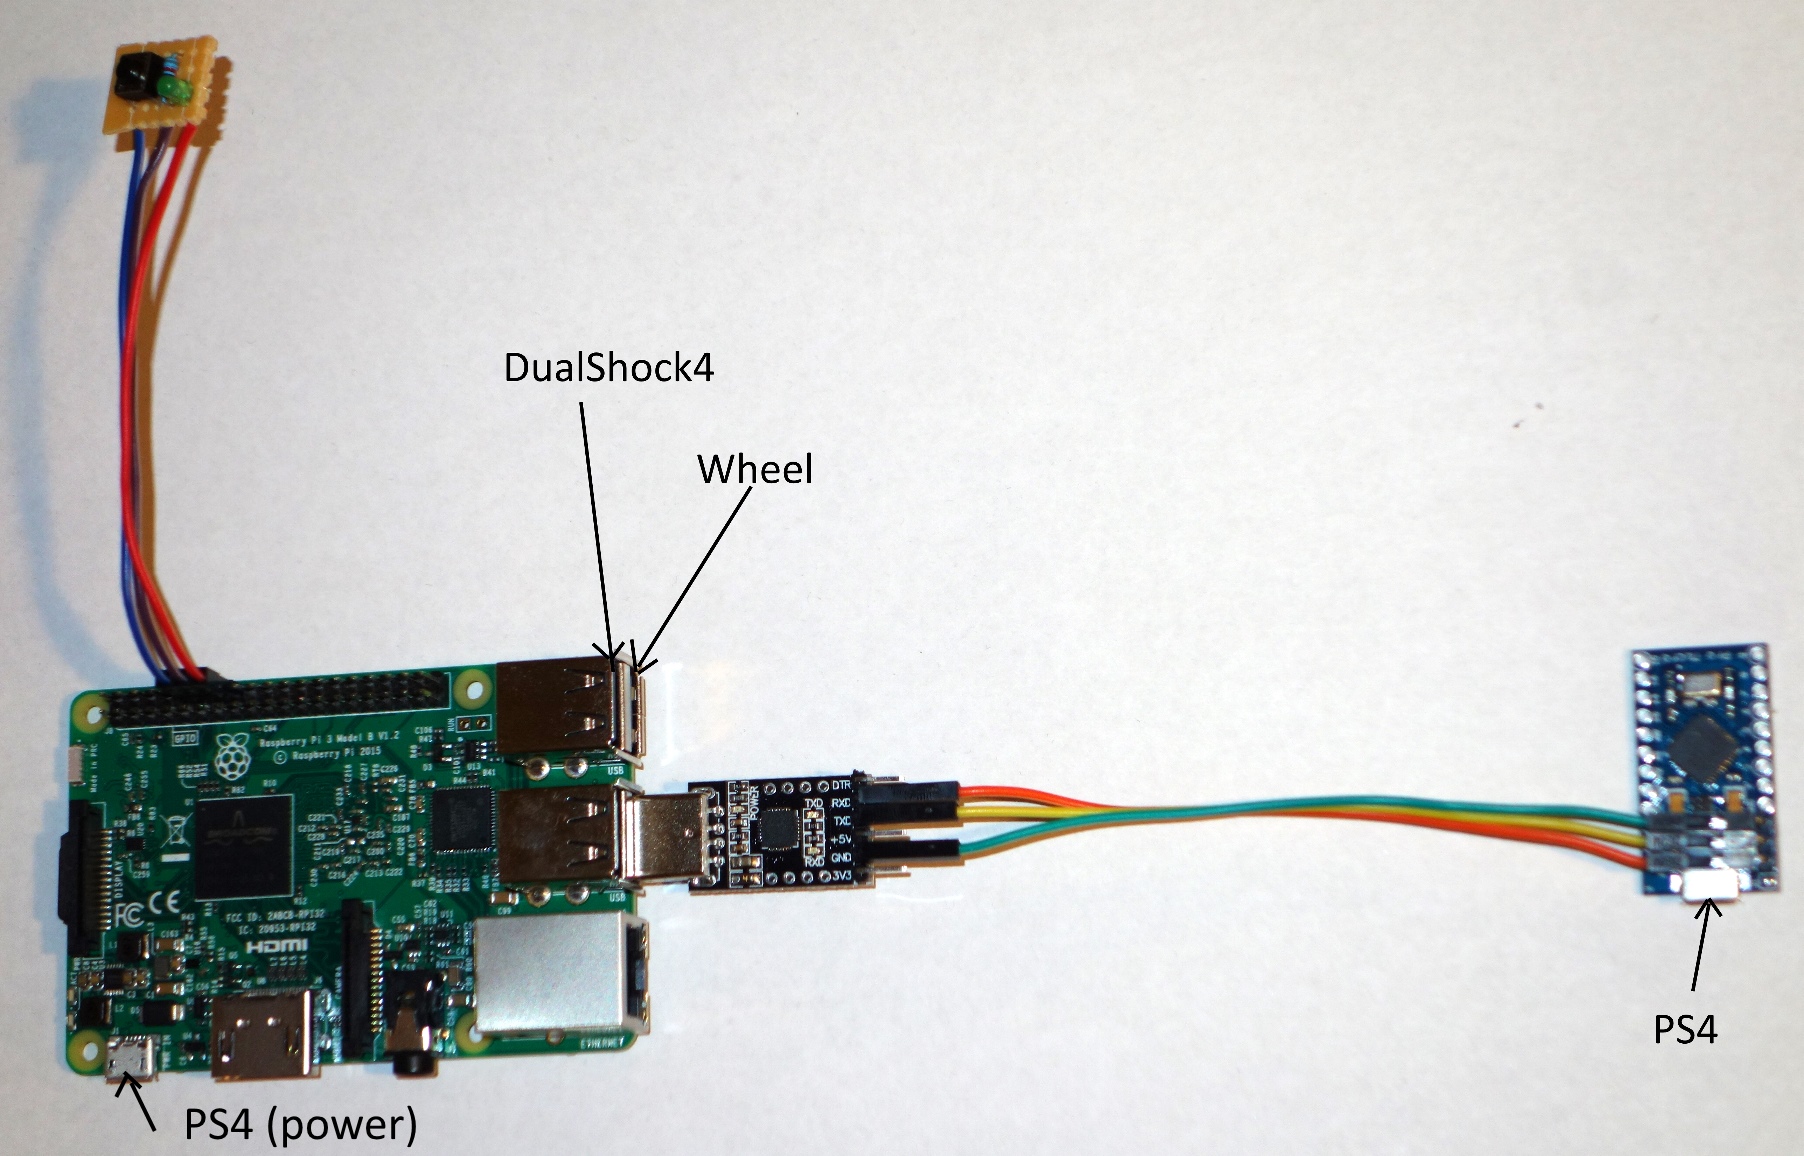
Note: this will only work out of the box with the G27 wheel on PS4. If you need it to work for something else, make sure you order the gimx adapter with the right config for your device, or flash it yourself according to Matlo’s instructions. Then follow my instructions to update the Rpi for your specific device: http://www.steve-marton.com/gimx/?p=237
Extra Points:
- You can buy a cheap raspberry pi case from Ebay
- You can build a small switch and LED on prototype board from Radio Shack. This gives you a status LED to tell you when gimx is up and running, and a power button to shut down the Rpi safely without corrupting the SD card. However, this is not essential, because in the event that your sd card gets corrupted, you can always easily burn the image again. You can look at the pics here for ideas on building the board (I just twist the leads of the components together on the back of the board, then solder): http://www.steve-marton.com/gimx/?product=power-button-with-status-led-for-raspberry-pi . You can glue this to the case if you’d like.
Read my other blog posts if you run into issues, and of course the super helpful docs and forums at gimx.fr.
Hi! Thanks for the instructions. I don’t see where the Micro SD card fits into this. Can you help me?
Thanks!
Never mind! I figured it out, thanks!
Me again! I got the Pi and loaded the micro SD and it all appears to be working. Unfortunately, I don’t have the GIMX adaptor yet but I wanted to program the Pi. I am able to log in and list all the available Gimx configs but when I try to change the config I get the following messge:
cp: cannot stat .gimx/config/LogitechG27_29.xml :No such file or directory
What does that mean? Also, if the standard load is the LogitechG27_29.xml than I probably don’t need to change it anyway.
You don’t need to change it.
You’d have to show me what command you used to get that error. But it’s probably easier to not worry about it 😉
Is it possible to do it with RPi and a Bluetooth dongle like the Orico and avoid needing the GIMX USB adapter?
Don’t know, sorry. Ask on the gimx forums.
Does the original RPi model A also work? (256mb ram)
I don’t know, I haven’t tried. Sorry…
Will this work with G25 also?
Yes, please see this post.
If I install this image to raspberry pi 3, is it possible to extract data from the Logitech G29 to the raspberry pi 3?
Don’t know what you mean by extract, but the signals are going to the rpi, so you can get them if you know how.
hello, sorry but what’s the program going for gimx?
Not sure what you’re asking, but you should find your answers on gimx.fr
I used your image.
worked very well
after updating the dietpi and gimx stop working
you can do a “how to” the upgrades
thanks
(sorry for my English… Google translator)
Unfortunately, I don’t have time to work on this project anymore… Sorry. You should be able to fix it by burning my image to the sd card again. Other than that, you’ll have to do your own research. If you figure it out and want to share, I’ll be glad to post it here.
What if I want to use the the onboard UART interface instead of a USB-to-UART adapter?
Are there any changes to your image needed, to use it that way:
https://gimx.fr/wiki/index.php?title=RPi#USB_adapter_using_the_on-board_UART_interface
In that tutorial, one has to disable the serial via raspi-config. Is this needed to be done in dietpi as well?
You should be able to just follow the instructions. I have not done those steps in the image.
What do I need to change to this image/config files to use the raspberry pi with the logitech Driving Force GT?
Hino. Do you find out What to do to workshop with wheel driving-force GT?
Hello
I’ve built the adapter with exactly the content shows in this post (Rasberri Pi B+, gimx adapter) in order to use my G27 on a PS4. The only change is the power supply which isn’t supply by the PS4 but directly by a transformer.
When I plug the adapter with the G27-PS4 according to the diagram, nothing happens excepted two leds bight on the Pi on one on the gimx. The PS4 recognise the Dualshock but the G27 doesn’t move when power is on.
What can I do?
Thanks
Make sure you have everything hooked up right. The DS4 shouldn’t be turned on or recognized by the ps4 in this setup, if I remember correctly. You can follow my post on debugging the rpi, and you can get help on the gimx forums. Good luck.
Hello Steve,
Thanks for your reply.
About the DS4. Do I need 2 DS4: one to open cession on PS4 and one for the RPi ?
Do I have to cut DS4 bluetooth connexion?
Just follow the directions exactly. Don’t turn on the DS4 that’s plugged into the RPi, simply plug it in. You don’t need to explicitly unpair bluetooth other than to turn of the PS4, turn it back on, and follow the connection steps exactly. If you’re still having trouble, read the gimx wiki and forums. Good luck.
Hello,
thanks for your great job.
Is it possible to use an existing Rapsbian image for a raspberry, and install the gimx service manually instead of burning your image ?
I already have a Rpi for domotic purpose and I just want to upgrade it in order the launch the gimx service. Is this possible ?
Many thanks.
Yes, of course, just follow the usual Gimx install instructions. I just made the image as a shortcut.
Hi. I’ve got RASPBERRY PI 1 MODEL B with 2 USB ports. Is it possible to build plug n play device using it with USB hub?
Yes, I think it will work.
Thanks for reply!
Hi, does the image include the GIMX autostart? Also, does it make a difference powering the RPi from the PS4 or transformer?
Thanks
Yes, it auto starts. You can power the rpi either way. I haven’t had any problems powering from the ps4, but apparently some people do.
hi, does your image have ltwheelconf pre configured in it? (or an alternative) so that all buttons are mapped and can use the full 900º rang etc?
Not sure what that means anymore. I loaded the stock config for that wheel setup. It worked as expected for me. Note though that it’s an old build by now.
Hello,
I hope this is not the dumbest question to ask.
I downloaded the Image an flashed at according to the steps on top.
But if I start the RasPi only an Image of a Flash occure on the Top right of my screen.
Furthermore the Pi don’t accept my mouse and keyboard.
Is there any common issue with this, or is it just me with the problem?
Greetings
Sebastian
Sorry, not sure what’s going on there. Maybe failed image?
Hi so also a dumb question but does this work for mouse and keyboard?
Also, how do I change it to be on xbox
You can follow the instructions here http://www.steve-marton.com/gimx/?p=237
Do you have a tutorial for building the adaptor? Possibly with parts needed off amazon?
Is it possible update gimx software to last version after installation image?
It should be. I don’t see why not. Let us know if there’s an issue.
It should be. I don’t see why not. Let us know if there’s an issue.
Can you reupload a image? Thanks
I am very excited by this method of running GIMX.
Does anyone have an active link to the preconfigured diet pi image?
Sorry for the late reply. I accidentally deleted the file. The link has been updated and should work now.
hi any config file for g920 ?
I don’t know, sorry.
I don’t know, sorry.
Will this work with reWASD’s GIMX firmware, and a Nintendo Switch along with using it as a multiple GIMX hub?
Is there any possibility to use it with a PS5 and without a controller plugged in to the Rpi+Gmix?
No idea, sorry. Haven’t played with this in years.